There are various ways in which tickets can be combined in a registration form. This tutorial will cover a number of different popular ticket combinations possible with Event Gate.
An overview of the different ticket combinations detailed in this tutorial include:
1. Single purchase tickets, where registrants can only register one ticket per attendee details entered.
2. Multiple purchase tickets, where registrants are able to select how many of each ticket they wish to purchase
3. Multiple Tickets, where the registrant has a number of tickets from which to choose.
4. Groups of tickets, where tickets are grouped into categories
5. Optional tickets, represented by a check-box, allowing registrants to optionally choose to select the ticket have been covered in the Ticket Types tutorial.
A image will be provided for each ticket combination to demonstrate how they will appear and behave on your event registration form.
Single Purchase Tickets
The most simple ticket setup is one ticket for single purchase.┬á This setup means that your attendees don’t need to select a ticket (there is only one ticket to choose from) and you will collect the registration details you have configured (name, company, position, address etc) from each attendee.
To setup a single ticket for single purchase event all you need to do is simple add one ticket, enter the ticket description and amount and click Ok to save the ticket. This completes the ticket configuration required for this event.  You can view the Ticket Types tutorial for more information on how to do this.
Multiple Purchase Tickets
For some events it may not be desirable for your attendees to enter the details (name, address etc) for each attendee, all they need to do is select the number of tickets they wish to purchase. This makes it easier for groups to register, but remember, you will not be collecting the specific details of each attendee, just the number of tickets being purchased and who is purchasing the tickets. So if you need to print out name badges, for example, this ticket configuration is not a valid option. If you need to capture the details for each attendee, but also want to allow multiple tickets to be purchased for each registration, you can use a single purchase ticket and ensure the “Allow multiple attendees to register in one transaction” option is set to “Yes” in the “Registration Options” on the “Payment” tab.
Setting up a single ticket, multiple purchase configuration is the same as the single ticket, single purchase, however, when adding the ticket, click the More Options button to reveal the advanced options. Then change the ticket purchase type to Multiple tickets can be purchased for each registrant.
Multiple Tickets
Many events require the registrant to select which tickets they wish to purchase. This is a simple matter of entering each ticket applicable for the event. One thing to note is the difference between how single purchase and multiple purchase tickets are added to the registration form.
Below is an image of multiple single purchase tickets:
Note: The registrant is only able to select either Adult or Concession.
Below is an image of multiple multiple purchase tickets:
Note: The registrant may select both Adult and Concession as well as selecting multiple quantities of each. They do not need to choose quantities for both, but they must select at lease one ticket from either to register for the event.
Groups of Tickets
Some more complicate events require groups of tickets. This is common practice for conference events that are held over multiple days, where attendees may choose different content streams and attend different seminars.
You can add ticket headings to separate different groups of tickets. You can view the Ticket Types tutorial on how to do this, however in this tutorial we would like to cover how adding groups may affect the behaviour of your registration form.
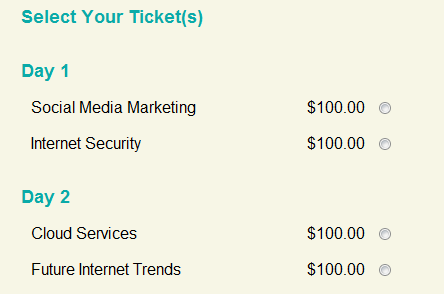
If you form has multiple single purchase tickets separated into multiple ticket groups you need to consider if you want your attendees to be able to select one ticket for each group, or one ticket in total. For example, say we have an event with tickets as displayed below:
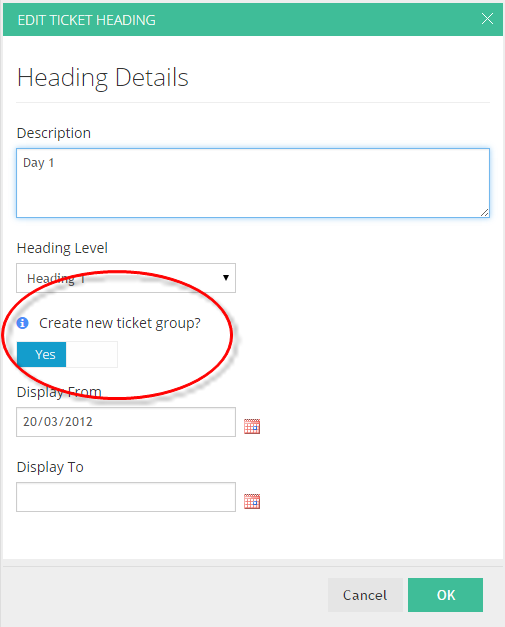
Normally, in this scenario, you would want your attendees to be able to choose one seminar per day. To achieve this, make sure you set the “Create new ticket group?” option to “Yes” when you are adding or editing your ticket headings, see below:

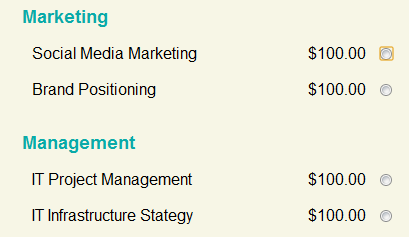
However, below is an example where you may have multiple streams, each containing different seminars, in which case you may only want attendees to be able to select one seminar in total (regardless of which stream):
In this case you would set the “Create new ticket group?” option to “No” when you are adding or editing your ticket headings.
Please also read about ticket categorisation to help distinguish tickets with the same description belonging to different groups.


